Showing posts with label dessert. Show all posts

Friday, May 6, 2022

It’s a Cookie! No, a Cake!... Wait – It’s a Cookie Cake for Mother’s Day!!

What’s cooking? Parisian Cookie Cake 


Several days before my very first Mother’s Day, I told my husband I did not want one of those ultra-sweet cards, like the ones with the flowers and lace that his mother always enjoyed. I just wanted something simple, ...but I didn’t say that part. And thus began another early lesson in husband-wife communications.

I thought: Maybe now, I’ll just get a nice, simple card... and maybe some flowers.
He thought: Ok, so she doesn’t want a card. Maybe she doesn’t want anything.

You can imagine how this worked out, can’t you? All I will say is that it involved tears on my part and a rant on his about how Mother’s Day and Valentine’s Day were just traps for guys, and a conspiracy on the part of the card and flower and candy companies. And every year since then, he has reminded me that I’m not his mother.

Then more recently, I actually forgot his birthday. Sort of. I had presents – not yet wrapped – but waiting to be wrapped. And while I always remember his birth date, we had so much going on in our lives that I didn’t realize the date had arrived. We were at a reunion of his college friends, and one of them gleefully announced that it was my prince’s birthday, while I sat slack-jawed at the news that I had missed the boat.

He was more than kind about it – actually thought it was funny – but of course, I was mortified. So I have given him a permanent pass for Mother’s Day.

* * *

If you’re looking around for an easy dessert to make for Mother’s Day, you have come to the right place. This one feels so much like an art project that I’m sure my own mother would have loved it. Very “hands-on.” Also elegant – the original recipe comes from Le Comptoir, the pastry shop at Paris’s legendary Ritz Hotel on the Place Vendôme.  (Of course it’s French. You know, chocolate.)

 And the whole process takes me little more than an hour.

What makes this cookie cake so good?
  • The texture is a mix of soft and crunchy – soft from the underlying cookie part that tastes very much like shortbread, and crunchy from the nuts on top.
  • Complex flavors. Instead of white sugar, the shortbread contains turbinado sugar, which is only partially refined so as to retain some of the original molasses from the sugarcane. Thus the subtle caramel flavor. And then there’s almond butter, that contributes a light nuttiness to the dough.
  • The shortbread bakes in a form that sits directly on the baking sheet, so the bottom of the cookie gets a little extra crispy caramelizing from the more direct contact with the sheet.
  • The topping is a riot of chocolate, almonds, and caramel (or butterscotch), with a finish of sea salt. I mean, what’s not to like?
    Kitchen Goddess note: The original of this cookie cake featured hazelnut purée instead of the almond butter, and chopped raw hazelnuts on top instead of almonds. Chef Greenspan suggested the almond butter/almonds. I’ve made it twice that way, and it’s fabulous. But I want to try it with the original flavors, using Nutella or Italian hazelnut purée and hazelnuts. I’ll let you know how it goes.

    The first time I made this dish was in December. Can you tell?


    Parisian Cookie Cake

    Adapted from Dorie Greenspan in The New York Times.

    Serves 8-12, depending on how generous you are with the pieces.

    Special equipment: 9-inch springform cake pan, baker’s parchment

    Ingredients

    1⅓ cups(170 grams) all-purpose flour
    1 teaspoon baking powder
    ¼ teaspoon baking soda
    4 ounces (1 stick/113 grams) very soft unsalted butter
    ¾ cup (150 grams) turbinado sugar (e.g., Sugar in the Raw)
    ½ teaspoon fine sea salt
    3 tablespoons (54 grams) of pure almond butter (i.e., without added sugar or other ingredients), well stirred 
    1 large egg, at room temperature and lightly beaten
    4 ounces (113 grams) semisweet or bittersweet chocolate, coarsely chopped
    ⅓ cup (48 grams) raw almonds, coarsely chopped
    3 tablespoons (60 grams) caramel (or butterscotch) topping, for finishing (use more or less depending on your taste for caramel)
    Fleur de sel, for finishing (I use Maldon salt, which is less expensive and easier to find). Do not leave out this salt: it adds crunch and that famous sweet-salty thing.

    Directions

    Preheat your oven to 350º. Line a baking sheet with baker’s parchment. Set the ring of a 9-inch springform pan (without its base) upside down on the prepared sheet. The ridge in the ring should be at the top.

    In a medium mixing bowl, use a fork or a whisk to stir together the flour, baking powder and baking soda, being sure to aerate the mix. Set the dry ingredients aside.

    In the bowl of a mixer fitted with the paddle attachment, cream together the butter, sugar and salt on medium-low for 2-3 minutes, or until the texture is smooth.

    Add the almond butter and continue mixing for another 2 minutes.

    Spoon in about a third of the flour mixture and beat – still on medium-low – until it’s absorbed into the butter mixture.

    Pour in the egg and mix on low speed until well incorporated.

    Add the rest of the dry ingredients and continue mixing on low until the dry ingredients are completely absorbed.


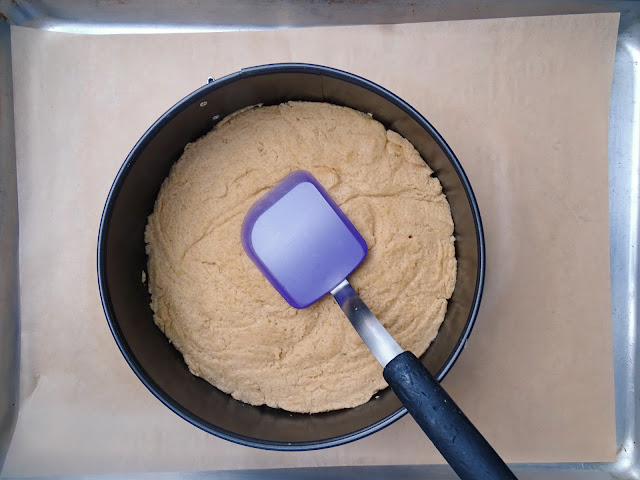
    Transfer the dough into the center of the springform ring. Use your fingers (or the back of a large spoon or an offset spatula) to get the dough pushed to the edges of the ring and evenly thick. Again using your fingers/spoon/offset spatula, gently smooth the surface of the cookie (no mashing down, please!).

    Ready for the oven.


    Scatter the chocolate and then the almonds across the surface of the cookie, and bake 22-26 minutes. (I have made this dessert twice in different ovens and needed almost 28 minutes the first time, 25 minutes the second time.) To test, insert a toothpick or other cake tester into an area of the cookie not covered by chocolate. If it comes out clean, the cookie is done.

    Move the baking sheet to a rack and immediately – but carefully – open and lift off the springform rim. Do not move the cookie. Once the cookie has cooled to room temperature, drizzle or dot the surface with caramel. Sprinkle the top lightly with sea salt. Don’t cut the cookie until it is completely cooled, as it tends to crumble while it’s still warm.

    Ready for the caramel and finishing salt.


    You could serve the finished product in 10-12 wedges, as Ms Greenspan suggests; but I find that people are happier with a dessert this rich if they can have something closer to bite-sized pieces. So I like to cut it in a lattice pattern with strips about an inch wide (see the diagram at left). This allows for smaller portions and even some oddly shaped pieces on the edge. The dessert goes well with vanilla ice cream.

    Wrapped in plastic wrap or in a sealed container, the cookie will keep for about 4 days at room temperature. 

     And a happy Mother’s Day to you all!

    Monday, January 10, 2022

    Wait a Minute – Christmas Is Over?!

    What’s cooking? Mamo’s Apricot Tarts


    You say Santa has come and gone?! But I have these tarts for him! Well, “Qué será, será.” What this really means is that I started this post before Christmas, and then... well, you know,... Christmas. So a few things got lost in the shuffle. But these delightful little pastries are so easy and fun that I felt sure you wouldn’t really care if they’re too late to be Santa treats. Make them now, and then again in December for Santa.

    My maternal grandmother was not known for her cooking. But she had two recipes at which she succeeded magnificently: brownies and apricot tarts. One of these days, I will divulge the secret recipe for her brownies – known to all of my friends as “Mamo’s Brownies” – but today is the day for her apricot tarts.

    She sent me shoe boxes of them when I was away at college, and my suitemates would fall on them like thirsty men at an oasis in the desert. (Do you ever wonder why it was always men dying of thirst in the desert? Personally, I think women are much too smart to strike out on their own in unforgiving climes. But I digress.) Anyway, those little nibbles were that good. Not overly sweet, with a flaky crust dusted with powdered sugar, and a tiny surprise of stewed apricots inside.

    I recently decided to try making them myself. I had plans to see my grandchildren over Thanksgiving, and we always enjoy baking together.

    The first challenge was to adapt the recipe. For instance, hers called for three 3-ounce packages of cream cheese, which now only comes in 8-ounce packages. The second ingredient was two sticks of margarine. Margarine? As a committed butter user, I had to work my way around that one. Then there was no indication of the size of the “one package” of dried apricots. And on it went. To call the instructions minimalist would be a vast understatement. But the Kitchen Goddess forged ahead.

    This project was especially fun because there’s a lot the grandchildren could do themselves. Once I got the dough rolled out, the 9-year-old cut out her own circles of dough, loaded them with the stewed apricots, and pinched the sides together herself. The 7-year-old didn’t like the icky way the dough felt on his hands, so I held the round of dough while he spooned apricots into it; then I folded it over and he pinched it shut. We managed this and another easy cookie (for another post), and we only took about 5 hours. It turns out that every project takes extra time when you’re baking with kids.

    So here they are. I will give you the recipe the way I made them, which was by stewing apricots. My cousin Helen goes the simpler route and fills them with really good, really thick apricot preserves. I will leave you to make your own choice – including that of using a different fruit altogether – and you don’t have to tell me which direction you went.

    Kitchen Goddess note: In the recipe below, the KG uses a combination of unsalted butter and Crisco – a technique she borrowed from her rollout cookies. You can just use 2 sticks of butter if you prefer, but Crisco’s higher melting point means it keeps the pastry layers separate longer as the dough bakes, which increases the flakiness/tenderness of the pastry and helps the tarts hold their shape in the oven.


    Mamo’s Apricot Tarts

    Makes about 3 dozen.

    Ingredients

    For the filling:
    8 ounces dried apricots, cut in ¼-inch dice
    ½ cup sugar
    about 2 cups of water

    For the crust:
    2 cups (250 grams) all-purpose flour
    Rounded ¼ teaspoon kosher salt
    One 8-ounce package cream cheese, chilled and cut into about 8 portions
    10 tablespoons cold unsalted butter, cut in ½-inch dice
    6 tablespoons Crisco

    For the finished pies:
    ¼-½ cup powdered sugar

    Special equipment: biscuit cutter, 3½-4 inches in diameter (I used a scalloped biscuit cutter because I thought it would look pretty, which it did, but – obviously – you can also use one with a plain edge. My grandmother used the lid to her percolator, so who knows what the original dimensions were.)

    Directions

    Start the stewed apricots first. In a small saucepan, stir together the apricots, the sugar, and 1 cup of water. Bring the mixture to a low boil and stir occasionally as the apricots absorb the water and become softer.

    As the mixture becomes jammier, add more water in ½-cup increments. Continue to stir occasionally until the apricot pieces begin to lose their form, and the mixture becomes truly jammy. Periodically, you may want to adjust the heat to keep the apricots from burning. Stop cooking when it reaches a degree of jamminess you like. (The Kitchen Goddess tends to cook hers for about 2 hours.) Set aside to cool. 


    Almost forgot to take this photo -- it’s what I had left after two batches of tarts. But you can see
    the consistency of my stewed apricots. Pretty jammy.

    Kitchen Goddess note: This recipe will make more apricot mixture than you need for one batch of tarts, but it freezes well in a plastic container, so you can make another batch at a moment’s notice!

    While the apricots are cooking, make the dough.

    Kitchen Goddess note: You can go the traditional route – mixing the dough by hand, using a pastry blender – but why would you? My grandmother mixed her dough by hand, but she was younger than I am now, and had no food processor. The KG uses her handy food processor, and has been delighted with the results. It takes almost no time at all, and it keeps the butter and shortening cold, which is key to producing flaky pastry. And the grandchildren enjoy taking turns at pulsing the machine.

    Measure your flour and salt into the bowl of a food processor and pulse 3-4 times, to aerate the flour. Scatter the cream cheese, Crisco, and cold butter evenly on top of the flour, and pulse until the dough begins to come together in a couple of large lumps. This will take 20-25 pulses, depending on how long your pulses are.

    Transfer the dough to waxed paper or cellophane wrap and refrigerate for 1-2 hours. A warning: You can actually refrigerate it overnight, but it becomes difficult to work with after only a couple of hours.

    Prepare a baking sheet (or two) with baker’s parchment, and preheat the oven to 375º. Prepare a small (custard-size) bowl with about ¼ cup of cold water.

    Divide the dough into halves, working one half at a time and refrigerating the other half. On a well-floured surface, roll the dough out to a ⅛-inch thickness. Use the biscuit cutter to cut circles you can hold on your open palm. Fill each circle of dough with about a teaspoon of the stewed apricots (or preserves), placing it slightly off-center so you have the other half to fold over. Dab a bit of the cold water around the edges of the circle, to help “glue” the two halves together. Fold the dough circles in half and use your fingers to gently press the rounded edges together.


    Ready for the oven.

    Ready for the powdered sugar!


    Place the completed tarts at least an inch apart on the baking sheet and bake 23-25 minutes until light golden brown on top. Set the pan on a baking rack and let the tarts cool for 5-10 minutes. While they are still warm, sift powdered sugar over them. The tarts will keep, stored in a closed container, for several days.


    Happy January to you all!

    Tuesday, July 3, 2012

    Red, White, and Blueberry Syrup
    What’s cooking? Uses for Blueberry Syrup


    Last year at this time, I was bemoaning our inability to see the NYC fireworks celebration because the city had moved it so far north as to be out of our field of vision. Well, it’s still out of sight, but this year, I have something much more spectacular to watch. My son and daughter-in-law are invited to a party not far from us, so Grumpy and I have been asked to babysit for our 6-month-old granddaughter.

    She’s not yet on solid foods, aside from her morning oatmeal, so I can’t cook anything for her. And she goes to bed waaaay before I do, so she’s not much for evening companionship. But she doesn’t seem to mind if I just sit and stare at her, which I confess that I do a lot. So it’ll be a quiet celebration of July 4th, but somehow, I don’t mind at all.