Friday, August 31, 2012

Almost Weekly Foodie Faves – A Friday Blogette: Salad Savvy


My husband and I almost came to blows over making the salad the other night. He insisted he was only tearing the lettuce because I had forbid him to cut it with a knife. But his method of tearing was to grasp several leaves at once and rip them apart with the same sort of action you’d use to take the head off a chicken. The Arnold Schwarzenegger school of salad making.

Now, I’ll admit to a certain degree of...umm...high-handedness when it comes to kitchen techniques, and my technique is to tear the lettuce into slightly-larger-than-bite-sized pieces, one leaf at a time. Takes me forever, but it looks great. I know, I know, it’s a miracle that he wants to help at all when the Kitchen Goddess is at the helm. But let’s not kid ourselves – when you’ve been in charge of the meals for 35 years, you develop certain – shall we say preferences? – about preparing the food.

Having staked myself out on this topic, I decided to see if there were any sources to back me up. It turns out that those brown edges you can get on lettuce pieces develop faster if you cut the lettuce with a metal knife. Which is why they sell those mostly-green plastic “lettuce knives”: to reduce the bruising or browning. So as long as you’ll be serving the salad immediately after assembling it, the salad police won’t come after you if you cut your lettuce.

I WILL SAY that my research shows that tearing the lettuce is still better. The leaf cells hold the water that makes the lettuce crisp. The knife cuts through the cells, whereas tearing causes breaks along the natural boundaries between cells, so the leaves stay crisp longer. One clever source I found compared the lettuce leaf to a piece of bubble wrap, which works conceptually but not in practice, as I’ve never been able to tear bubble wrap without destroying it.

But the Kitchen Goddess, if she knows what’s good for her, will back off and let her husband cut the lettuce. Otherwise, she may end up alone and lonely in the kitchen, standing on her principles while she tears the damn lettuce.

Other bits of salad savvy:

1. Go easy on the vinegar. If you’ve splurged on a nice olive oil, you’ll just hide that good flavor. Several years ago, I spent a blissful week eating and writing in Tuscany, at a castle called Spannocchia. The castle staff grow all their own vegetables, and salads were served with nothing but herbs and olive oil, and the occasional lemon wedge. They were the best-tasting salads I’ve ever eaten.

2. Dry your lettuce with a couple of paper towels before you dress it. Water on the leaves keeps the oil from adhering to the greens, and your carefully made dressing will slip down to the bottom of the bowl.

3. Don’t dress the salad until you are ready to serve it. Wilting begins the minute the greens come in contact with the oil, so you want to delay that as long as possible.

4. When it comes to the dressing, start small, less is more, a little goes a long way – choose your cliché. But you’ll almost always need less than you think, so it’s better to pour, taste, and add more if necessary than it is to add too much then pretend to your guests that it’s the way you meant it to be.

5. Serve on cold salad plates. Stick them in the freezer for 5-10 minutes before putting salad on them. The chill helps to keep the greens crisp.


And now for my favorite vinaigrette. Please note that the honey is optional for those of you who prefer a tarter dressing. It’s only a tiny bit of honey, but it makes a difference.

Parsley Shallot Vinaigrette

1 teaspoon shallots, minced
2 teaspoons parsley, chopped fine
1 teaspoon Dijon mustard
½ teaspoon salt
1 teaspoon lemon juice
½ teaspoon white wine vinegar
¼ teaspoon mild honey (optional)
6 tablespoons olive oil
a few fresh grinds of pepper

In a small bowl, whisk together the first seven ingredients (shallots through honey) until well combined. Add the olive oil in a thin stream into the bowl, whisking vigorously all the while. Taste and adjust seasonings. Add pepper to taste and stir well.

Wednesday, August 29, 2012

Preserving Summer


“This is the last week of the peaches, ma’am.” That’s what the guy at the farmers’ market said yesterday morning, sending me into yet another fury of fruit-buying. “So I’ll take an extra box of them,” I said. Then I rushed over to the other good fruit stand and bought four boxes of purple plums. At the counter, I noticed really good looking dark figs, and grabbed three boxes of those. And just as I was about to break free, I saw that they also had those big, tart red-orange plums. “I don’t know what I’m going to do with these,” I said, “but give me a couple of pounds.”

As September comes rushing toward us, I’m scrambling to develop culinary souvenirs of the summer. In addition to a precious batch of bright sugar plum soup, I’ve frozen a quart of mellow, slightly sweet corn soup. Then there are the desserts – with berries no longer in season, I’ve been making sorbets from every melon that’s rolled my way.

But sorbets won’t keep forever. If you don’t eat them within a week or two, they become hard, tasteless, blobs from the defrosting-refrosting cycles of the freezer.

So I’m preserving. The highlight of which this week was figs.

I’ve been in love with figs since childhood, when one of the major features of my grandmother’s back yard was a pair of giant fig trees. If I spent the night at her house when the figs were ripe, I’d go out and pick a giant bowl of them for breakfast. And as the season wore down, she’d make a big batch of fig preserves to last through the year. I saved all her recipes I could find, but I’ve never uncovered that recipe, and I suspect she used a method more seat-of-the-pants than written directions.

Now before you roll your eyes at the idea of making preserves, let me just tell you that there’s hardly anything more satisfying in the middle of a cold, gray winter day than opening up a jar of something that calls up memories of the very best of summer. You can find a recipe for preserving almost anything on the web, and most of them are pretty simple. Fruit, sugar, a bit of lemon juice (which helps retard spoilage) and any other flavor you want to mix in: clove, cinnamon, ginger, almond extract, various liqueurs, ... the list is endless. About the most difficult part is finding a grocery store that stocks Mason jars, which are the best and easiest to use. They come topped with metal bands and rubber-rimmed lids; the bands are reusable, but the lids shouldn’t be used for more than one round of preserves.

Just FYI, they’re called Mason jars after the guy who invented them, but these days, most of what you find are made by the Ball company, so they’re called Ball jars. Whatever. And while I’m mentioning it, why do they call them “canning jars”? Talk about an oxymoron.

So in the absence of my grandmother’s recipe (which I suspect was just whole figs and simple syrup), I experimented a bit. I wanted something a little less intensely sweet than most (including my grandmother’s), so I worked a whole lemon into the mix, and because I can never resist the lure of candied ginger, I added some of that as well. It’s not too sweet, so I’m planning to smear some as a glaze on a pork tenderloin or chicken breasts; but I tested some on a waffle this morning (gave it an A), and my husband still thinks it’ll be swell over vanilla ice cream.


[Kitchen Goddess note: Some of what you read below – the parts about the jars and lids and the processing – are a repeat of my previous post, but I figure you may not want to go searching, so here it is again. Also, you may not yet feel entirely comfortable with the whole canning business, so why should I make it harder on you? The Kitchen Goddess herself has to read and re-read this stuff.]

Lemony Fig Preserves

2 pounds figs (I used Mission, but green figs would work as well)
1 lemon
1 cup sugar
2 tablespoons candied ginger, chopped

Start by running your jars (without the rubber-rimmed lids or the metal bands) through the dishwasher. The jars should be kept hot until you’re ready to fill them, so I just leave them in the dishwasher with the door closed. Put the bands in a small saucepan with water to cover, and bring to a boil. Turn off the heat and add the lids. Cover the saucepan until the preserves are ready.

Slice the stems off the figs and cut the fruit into eighths. Slice the ends off the lemon and cut the fruit (including skin) into ¼-inch dice, excluding the pithy center (what is that part called?). Put all ingredients into a large saucepan, and bring it to a low boil, stirring constantly until the sugar dissolves, and then occasionally until the end. Simmer until the mixture reaches 220º, which will take about 20 minutes.

Carefully – they’ll be hot – remove the rims and bands from the water and let them dry briefly, as you don’t want any water in the jar. Spoon the preserves into the jars, leaving ¼-½ inch of space at the top, then add a lid and a metal rim. If your plan is to eat everything within a month, you can store them as is in the fridge. If you want to make them last longer, put the closed jars into a large pot of water to cover, and boil them 10 minutes. Using tongs, transfer the jars to a work surface and leave them overnight or until cool. You’ll hear a ping as each ring seals. I count the pings to make sure all the jars seal. If one doesn’t, stick it in the fridge or sterilize a new lid and ring and run the jar back through the boiling process. If a jar has properly sealed, you’ll be able to remove the ring and lift the jar by the lid.

For best results, store processed jars in a cool, dark place.


Friday, August 24, 2012

Possessed!


N.B. Ok, so this is really more of a regular blog than a Friday Fave, but when you try the recipe below, you’ll understand how it can be both.

I really think I must have been possessed at the farmers’ market this week. The weather had cooled off – the morning temperature was about 66 degrees when I got out of my car at 8:00 a.m. I was maybe the first person at the market when it opened.

I’m not normally an early morning person. Late night is when I shine. But here in New Jersey, my husband and I are dealing with the one-car phenomenon, because parking in Jersey City is completely ridiculous. The main streets in our neighborhood have parking only on one side of the street, and then only if you have a “Zone 1” permit. (We do not.) You can park in front of our building, but the number of spaces available is very small versus the number of folks living in the building, and the fight for those spaces isn’t pretty. So when we bought the apartment, we made sure to get a place that came with a slot in the garage. But that’s only one.

Which leads me to why I’m able to be at the farmers’ market at what for me is the crack of dawn. If I want to show up at all, I have to get up at 6:45 (!) to drive my husband to the golf course, so he can be there in time to tee off at 8:00. (And I have no idea why that’s such a special time, so don’t ask.)

Something about all those fresh foods and me being one of the few people in the market at that hour sent me into a buying frenzy. So much so that once I got home with my bounty, I had to make a list of what I had in order to remind me to do something with it. For many of the items, I had – and still have – no plan. For the raspberries, however, I wanted to try a jam-like spread from a recipe I saw in the NY Times this week. It’s made with chocolate and almonds and the berries, and I confess to a complete lack of control when it comes to chocolate and raspberries.

It took me way longer than I had planned, because I didn’t read the recipe carefully and forgot to chop the almonds until after they had gone into the chocolate-raspberry mix, so I spent a good half hour spreading small batches of the hot, goopy concoction out on a cutting board and chopping the almonds in the midst of it. What a mess. But it did mean I got to sneak some tastes of this heavenly stuff. Just read all the directions first, okay?

And if you want to know what to do with the spread, here are some options:

1. Spread it on a croissant or a brioche for breakfast.
2. Heat it and spoon it over good vanilla ice cream.
3. Do as my husband and I are so far doing, by sticking a knife or spoon into the jar and eating it straight.


Kitchen Goddess note #1: According to Ms. Barrow, “Raspberries are best when used without rinsing.” And apparently, Ina Garten concurs. I didn’t really care, as I got mine from an organic stand and they get boiled plenty in the recipe. You do want to make sure you toss any that have white mold on them.

Kitchen Goddess note #2, ABOUT PRESERVING: This recipe makes 4 cups of spread. You may want to use some of it immediately, but trust me that you will want to preserve some of it for later. I’m actually planning to give ½-cup jars of it to friends for Christmas. If you like that idea, you’ll need a box of Ball’s Jelly Jars. As preparation, before you start cooking the spread, remove the rings and lids and run the jars through the dishwasher; leave them in the machine until you’re ready to fill them. Stick the canning rings into a small saucepan with water to cover, and bring it to a boil. Turn off the heat and add the lids to the water. Cover the pan until you’re ready to fill the jars.


Raspberry Chocolate Almond Spread
Adapted from Cathy Barrow in The New York Times

1 cup slivered almonds
36 oz raspberries, picked over and not rinsed
3 cups sugar
2 Tablespoons lemon juice
8 ounces high quality bittersweet chocolate (at least 50% cocoa solids) [The Kitchen Goddess used Ghirardelli.]
⅛ teaspoon almond extract (get the pure stuff, not the imitation)

1. Toast the almonds using one of the following methods: (1) Put almonds in an ungreased skillet over medium heat and stir until they turn golden brown; (2) Spread almonds in a single layer in a shallow baking pan, and roast 10-15 minutes at 350º. Let the almonds cool and chop them to a fine consistency.

2. Bring the raspberries and sugar to a simmer in a large, heavy saucepan. Stir until sugar is dissolved. Remove from heat and run the mixture through a fine sieve, scraping and pressing to get all the juice, or use a food mill (much easier!) to remove the raspberry seeds. Or leave the seeds in if you prefer, but the consistency is much better without the seeds.

3. Pour the raspberry-sugar mixture back into the saucepan, add the lemon juice, and boil it for 5 minutes, stirring constantly. Add the chocolate and boil for another 5 minutes, still stirring constantly. Turn off the heat and let the mixture rest for 2 minutes. If the surface “wrinkles” when you press it gently with a spoon, it’s cooked enough. If it doesn’t wrinkle, boil the mixture another 2 minutes and test again. You shouldn’t have to boil it more than the extra 2 minutes.

4. Stir in the almond extract and the chopped almonds. You can keep the spread in jars – unprocessed – in the refrigerator for about a month. To keep them longer, go to step 5.


5. Spoon the spread into the preserving jars, to a level about ½ inch from the top, wiping the tops and sides of the jars clean with a damp paper towel. Place the lids on and screw on the rims. Put the closed jars into a large pot of water to cover, and boil them 10 minutes. Using tongs, transfer the jars to a work surface and leave them overnight or until cool. You’ll hear a ping as each ring seals. I count the pings to make sure all the jars seal. If one doesn’t, stick it in the fridge or sterilize a new lid and ring and run the jar back through the boiling process. If a jar has properly sealed, you’ll be able to remove the ring and lift the jar by the lid.

Friday, August 17, 2012

Almost Weekly Foodie Faves – A Friday Bloguette: Julia’s New App


She makes it look so easy. Julia, that is. In my last post, I mentioned her new app, “Mastering the Art of French Cooking,” which has just been released by Random House Digital (owner of Knopf, her publisher) in celebration of the 100th anniversary of her birth. And while I’d have paid $2.99 just for the treat of watching Julia in action again, I must tell you that it’s about the best value I’ve gotten for that amount in recent memory. By the way, the brief on this app at the iTunes Store says the $2.99 is a special introductory price through the end of August.


For starters, I love that it’s more about technique than straight-out recipes, although the techniques all relate to at least one recipe from the book (MAFC). There are the 30 video clips starring Julia, as she demonstrates how to poach an egg or make hollandaise sauce or truss a chicken. (I can’t decide if these were from her TV series or if she did them separately for some other commercial purpose – she wears the same clothes in all the ones I’ve watched. Hmmm.) In fact, she makes it look so easy that I’m encouraged to try many of these things myself. A confession: I recently poached my first egg ever. Really. And while the look of it wasn’t perfect, I plan to spend some time watching Julia to see if I can’t improve.

So it’s a fun app, and particularly instructional for those of us who learn better from watching than from reading. You only get 32 recipes, but she gives you variations on many of them that expand the range of possibilities.


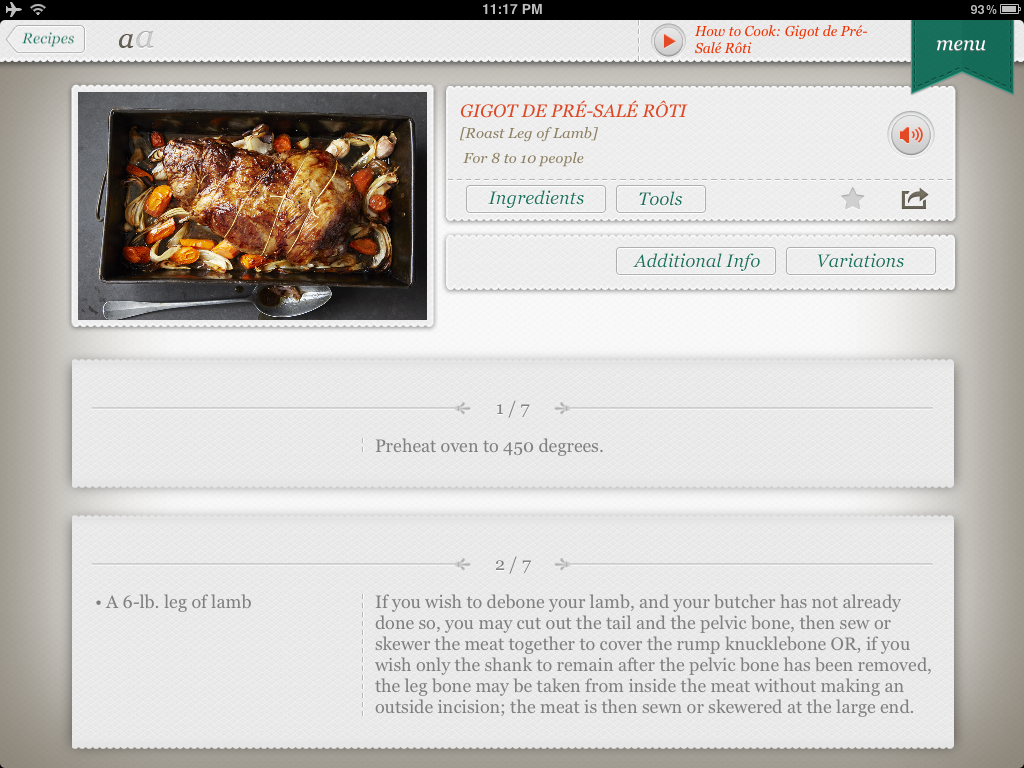
Other nice features include a grocery list you can edit and email to yourself; good color photos of the finished dishes; and a remarkable page of “Other Information” that includes a glossary of cooking terms, a discussion of kitchen equipment, an illustrated how-to on knife skills, and an extensive treatise  – with recipes, separate from the featured recipes – on stocks.


You’ll even learn how to pronounce “bouillabaisse.”


Wednesday, August 15, 2012

Celebrating Julia Child


Kitchen Goddess note to iPad fans: I’ve just purchased the Mastering the Art of French Cooking app, which I will review more extensively in another post. It’s only got 36 recipes, but each contains a complete clip – in color – of Julia herself cooking the recipe. So just for that, I give it 5 stars. 


I remember the first time I had vichyssoise. I had recently moved to New York, and my lack of sophistication was almost palpable. In spite of this flaw, I was treated to dinners at a number of the finest restaurants in the City. Not because I was adorable – though I was – but because my roommate was dating a married man, and he needed my presence on their dates to look innocent. And aside from the obvious fly in the ointment, he was a delightful dinner partner. Which is more than I can say for her.

So, hey – I needed dinner, and why not enjoy it at Le Pavillon or Lutèce or Le Grenouille?

The downside was that I had never been in a place where the menu was entirely in French, and my foreign language studies had consisted of eight years of Spanish. So I was at my host’s mercy to translate. He suggested at one of those establishments that I try the vichyssoise.

OMG. What an epiphany. I think that was the night I became a foodie. And of all the people who made vichyssoise accessible to neophytes like me, Julia Child is the leader.

A simple, easy to prepare soup that’s traditionally served cold but can as easily be served hot (without the cream, when it’s called Potage Parmentier), vichyssoise is a truly classic French dish. And among the most elegant ways to start a dinner party. In fact, it was my go-to appetizer course for more years than I can remember.

But for me, I just like to have some on hand for lunch. Especially in summer.

“Here is the mother of the family in all her simplicity. You'll note there's no chicken stock here, just water, leeks, potatoes, and salt in the soup base. However, you may include chicken stock if you wish, and you may certainly include milk. A bit of cream at the end is a nourishing touch, but by no means necessary. If you are not pureeing the soup, cut the vegetables rather neatly.” — Julia Child from The Way to Cook, Alfred A. Knopf.

Kitchen Goddess note: She’s so cute. Of course, you must purée the soup – well. For the color as well as the consistency. Other points I should make:
1. I recommend the chicken stock (or vegetable stock), and the cream at the end, which really gives it a velvety consistency and a clean, bone-white color.
2. I use not just the white parts of the leeks, but also the very light green.
3. I serve with a sprinkling of chives on top, which I think is preferable to parsley. After all, this is a soup about the onion family.
4. Julia recommends using old or baking potatoes, so if you have potatoes that have been sitting around for a couple of weeks, this is the ideal use for them. Apparently, with age, the starch in potatoes begins to turn to sugar, which adds to the flavor.
5. You can construct endless variations on vichyssoise by adding various veggies to the leek/potato stew: a big bunch of watercress, or diced zucchini, or chopped asparagus stalks (saving the tips for garnish),... Use your imagination.


Vichyssoise
From The Way to Cook by Julia Child (Alfred A. Knopf)
Reprinted with permission.

INGREDIENTS:
4 cups sliced leeks, whites only
4 cups diced potatoes (old or baking potatoes recommended)
6 to 7 cups cold water
1½ to 2 teaspoons coarse salt or to taste
½ cup or more sour cream, heavy cream, or crème fraîche, optional
1 tablespoon finely chopped fresh chives or parsley

METHOD:
Special Equipment Suggested: A heavy-bottomed 3-quart saucepan with cover

Bring the leeks, potatoes and water to boil in the saucepan. Salt lightly, cover partially, and simmer 20-30 minutes, or until the vegetables are tender. Purée the soup if you wish. Taste, and correct seasoning. After chilling the soup, you may wish to stir in a little more cream. Taste carefully again, and correct the seasoning. Top each serving with a sprinkle of chives or parsley.

Yield: 6 to 8 servings

Saturday, August 11, 2012

Kitchen Olympics

Tomato Gymnastics

I was in Texas a week ago, and thanks to an excellent sprinkler system, my garden has taken on Olympic qualities in spite of the toasty temperatures and my absence. Admittedly, what I have planted there is mostly basil and tomatoes and green beans, all of which you have to work pretty hard to kill.

My husband joined me for part of the time, then decamped back to New Jersey where the golfing can take place in more reasonable temperatures. Which left me alone with the beans and tomatoes and basil. And no one around at night to tell me (a) that I should probably go to bed, or (b) that if I insist on staying up, I can’t be banging around in the kitchen. You see where this is headed, don’t you?

Ready for a basil marathon
So there I was, around 10 o’clock at night, which is when the kitchen crazies often strike, and it was the night before I was heading back to New Jersey, and I still had this ridiculous crop of basil outside. Never mind that I couldn’t see it in the dark – I knew it was there. And the opening ceremony of the Olympics was on and I had missed the very beginning but NBC was re-running the whole thing! All these italics are there to give you an idea of the running and jumping going on in my brain.

In the Austin heat (88º at 10 p.m.), you really do have to focus on inside activities during July/August, so I’d already been cooking up a storm. I made the Potato and Green Bean Salad with Arugula Pesto for a second time, and the Burrata with Shredded Sugar Snap Pea and Crispy Shiitake Salad. I mixed basil pesto with part of my crop, served the traditional way over pasta, then needed to make room in the freezer for the leftover sauce, so I thawed some chicken and made chicken soup with the deep green, meaty collards I’d found at Whole Foods. And had to find room to freeze that, because who eats hot chicken soup in the summer? Ah, and I produced cold zucchini soup to be a pick-me-up during the day. I don’t know what got into me.

That was before Saturday. I was still in a foodie frenzy, and I could see that the basil would go to seed before I got back again; I was desperate to harvest what I could. I’d already puréed it in the pesto. I’d shredded it in a salad of Jersey peaches I’d carried South on the plane, with tomatoes from the garden and some oil and balsamic vinegar. Then as I cruised the web for more alternatives, I found two totally new (to me) concepts: a basil-lime sorbet, and a wine-basil gelée that’s served with watermelon sorbet.

It was about 3 a.m. when the Olympics opening ceremony and I finished, but I didn’t regret the lost sleep. The basil-lime sorbet was easy and fun, with an intense flavor of both the basil and the lime – so intense, in fact, that it never really solidified in spite of several hours in the freezer. So I’m going to play with that and get back to you with a formulation that works a little better. But the gelée/watermelon sorbet combo gets a gold medal in any field.

On their own, the watermelon sorbet is sweet and refreshing, and the wine-basil gelée is, um, very basily – but in a good way. Served together, however, the effect is to soften both flavors into a subtle mix of melon and the peppery, grassy notes of the basil. I think it helped that the wine I used was a citrusy New Zealand Sauvignon Blanc, which helped pull the lemon flavor into the mix. The combination becomes barely sweet but most alluring. I dished out enough for this photo and then inhaled the entire serving.

Unless you’re much more organized than I am – and many of you will be – it’ll take about an hour of actual work to produce each of the two elements. Both are amazingly easy, but you have to pay attention to what you’re doing with the gelée, and seeding the watermelon is, of course, a pain in the butt. But the final product is terribly elegant and unusual, and tastes really good.


Watermelon Sorbet and Wine-Basil Gelée, adapted from Gourmet, July 2004

For the sorbet:
¾ cup sugar
¼ cup water
finely grated zest of 1 lemon
5 cups seeded watermelon, in chunks
juice of 1 lemon (about 2 Tablespoons)

 For the gelée:
¼ cup packed fresh basil leaves
1½  cups dry white wine
½ cup sugar
finely grated zest of 1 lemon
½ cup plus 2 tablespoons water
1 envelope (2 teaspoons) unflavored gelatin
juice of 1 lemon (about 2 Tablespoons)

Special equipment: an ice cream maker

Make the sorbet:
1. In a small heavy saucepan, bring the sugar, water and zest to a boil, stirring just until the sugar dissolves. Turn the heat down slightly and simmer 2 minutes.

2. Combine the watermelon, lemon juice, and syrup in a blender, and purée until very smooth, about 3 minutes.

3. Process in an ice cream maker, and freeze in an airtight container for several hours (until firm) before serving.

Make the gelée:
1. Blanch the basil: Fill a medium-sized saucepan about half full of water, bring to a boil, and add the basil leaves for 5 seconds. (That’s right – 5 seconds.) While you’re waiting for the water to boil, prepare a medium-sized bowl with ice and water. When the blanching 5 seconds are up, transfer the basil leaves to the ice water bath for 20-30 seconds – just enough to stop the cooking, then wrap the leaves in a paper towel and squeeze dry.

2. In a small heavy saucepan, bring the wine, sugar, lemon zest, and the half-cup of water to a boil, stirring just until the sugar dissolves. Turn the heat down slightly and simmer 2 minutes.

3. While the wine syrup mixture is simmering, pour the remaining 2 tablespoons of water into a medium-sized bowl, and sprinkle the gelatin over it.

4. Line a sieve with a damp paper towel, and pour ½ cup of the wine syrup through it into the gelatin. Stir until the gelatin dissolves. Hang onto the paper towel-lined sieve, as you’ll use it again.

5. Combine the basil, the lemon juice, and the remainder of the wine syrup in a blender, and  purée until very smooth, about 3 minutes. Using the paper-lined sieve, strain the solids from the purée into the gelatin mixture and stir. [The Kitchen Goddess finds it helpful to take a spoon and lightly scrape the purée against the paper towel so as to move around the solids in the straining process. You want to get as much of the liquid into the gelatin as possible.]

6. Refrigerate the gelée (uncovered), stirring occasionally until it gets cold, then allow the mixture to set (about 2 hours).

To serve:
Break up the gelée with a whisk, and spoon 2-3 tablespoons into a glass or dessert bowl as a bed for the sorbet. Garnish with a basil leaf or a thin ribbon of lemon zest.

Thursday, August 2, 2012

How Many Ways Can You Dice a Tomato?


In the cookbook-developing, recipe-writing, food-blogging world, it’s generally accepted that if you change three ingredients in a recipe, you can call it yours. If you’re writing about another person’s recipe – in print or online – you should give attribution, noting that the recipe is “adapted from so-and-so,” but that also means you have to actually adapt (rewrite) the procedures, to reflect your own production of the dish. And even if you change the ingredients and rewrite the procedures, it’s considered gracious and greatly appreciated if you note that the recipe is “inspired by so-and-so.”

So with that etiquette in mind, here’s a little story.


In the process of working on this week’s post, I went back to Michael Natkin’s Herbivoracious blog, where I remembered seeing a nice salad of new potatoes and green beans with arugula pesto. (He also has a book by the same name.) How hard can this be? I thought to myself, googling Natkin’s name and the ingredients in the recipe. Lo and behold, the Google machinery churned out a full page and a half of newsletters, blogs and Pinterest pages – all with reincarnations of this same recipe, and all having “adapted” theirs from Mr. Natkin. The first of these actually “Reprinted with permission,” which appeared to be a word-for-word reproduction of the recipe from Natkin's book, also named Herbivoracious. And near the end of the list was a blogger who posted her recipe as “adapted” from one of the previously listed adapters, and any reference to Michael Natkin had disappeared entirely. Too bad, Michael.

For all the ridiculousness of countless food writers and bloggers huddling over their computers, trying to reword the directions to sound somehow like their own, there’s a good reason for this particular flurry of attention: the recipe makes a delicious salad – bright and fresh-tasting, with the peppery, garlicky flavors of the arugula pesto – that’s easy to assemble.

Haricots verts (left) versus green beans.
I like this dish especially now that both haricots verts and fingerling potatoes have shown up at the farmers’ market. For a salad, I much prefer the size and tenderness of the haricots verts, although you’ll notice in the photo that I had to use baby new potatoes instead of fingerlings. And, as it happens, the Kitchen Goddess has had her own arugula pesto recipe for years, so that recipe makes its appearance here in lieu of Michael Natkin’s.

Fingerling potatoes
Around and around the recipe goes, and where it stops, nobody knows. Someday soon, somewhere out in cyberspace, you might find my version has inspired or been adapted by some other cook. You might find it, but I’m not going looking.


Potato and Green Bean Salad with Arugula Pesto
Adapted from and Inspired by Michael Natkin’s book/blog, Herbivoracious

For the vegetables:
1 pound fingerling potatoes (or baby new potatoes – no larger than a golf ball)
½ pound haricots verts, halved and stem end trimmed

For the arugula pesto:
2 cups arugula leaves (well packed)
6 Tablespoons pignoli nuts
2 garlic cloves, peeled
1½ teaspoon salt
¾ cup extra virgin olive oil
3 Tablespoons sour cream
1½ Tablespoons lemon juice
finely grated peel from one orange (about 2 teaspoons)

1. Make the arugula pesto. Place arugula, pignoli nuts, garlic, and salt in a food processor and pulse until they are combined into a grainy paste. With the processor running, add olive oil in a slow stream and continue processing until well combined. Add remaining ingredients and process until smooth. Remove to a bowl and refrigerate for an hour before serving. [Kitchen Goddess note: This recipe makes much more pesto than you need for the salad, but refrigerate the rest – or freeze it – for another occasion. Arugula pesto is a little too bitter for pasta, but great as a crudité dip for endive, carrots, red or yellow bell peppers, asparagus, etc. And it really brightens up scrambled eggs or a frittata.]

2. Cook the vegetables. Put the potatoes (skins on) in a large saucepan with heavily salted water – as salty as the ocean – to cover 1-2 inches above the potatoes. Simmer gently for about 10 minutes, or until the potatoes can be easily pierced with a paring knife. Using a slotted spoon, remove the potatoes and return the water to a rolling boil. Add the haricots verts, and while they are cooking – only about 3 minutes, so hurry! – get a large bowl of ice water. Once the beans taste tender-crisp, plunge them briefly (about 30 seconds) into the ice bath – long enough to stop the cooking but not so long that they lose all their heat. Lay the beans out on paper towels to dry while you cut the warm potatoes into slices about ¼-inch thick.

3. With a couple of wooden spoons, gently toss the vegetables with ¼ cup of the pesto, add kosher salt and freshly ground pepper to taste.

Serves 4.