Friday, October 4, 2013

Back to the Grill
What’s Cooking? Grilled Broccoli with Chipotle-Lime Butter and Queso Fresco

The great North-South migration is now in full swing. We have friends heading to Texas from Nantucket, the Jersey shore, Wisconsin, and Colorado; others fleeing Alaska and New Jersey for  Arizona; quite a few ditching New York and New Jersey for Florida; and a final few escaping Maine for the Carolinas or even just as far south as Connecticut. Makes you wonder who’s left to shovel the snow when it arrives.

As usual, arriving home after three months is more than a little disconcerting. Where are the knives in this kitchen? I thought I had more olive oil than this, and do I not have any garlic? And, for some reason, the internet service is down. It turns out that if you go away for long enough, there’s bound to be an electrical storm in your absence that causes various outdoor plugs to spasm or your router to have an epileptic seizure. The ice machine doesn’t work either, so we spend the first few days calling repair services.

Then there’s the chicken in the fridge. Friends, a word of advice: do not leave a partially eaten roast chicken in your refrigerator for a month. I’ll confess that I was the one who left it there during a brief mid-term visit. On my return, I didn’t even open the paper bag it was in – I just removed it carefully to the garbage can before it could explode.

On the other hand – and thankfully, there always is another hand – the weather is at last temperate enough to eat on the porch, and we are at last back in digs that offer grilling. Fall veggies present wonderful opportunities for that method of cooking, and I have one for you here, today.


A Couple of Short Digressions – on Broccoli and Chipotle

In the years when I was actively mothering, broccoli was my go-to green vegetable. (“Hah!” my full-grown sons would say, “You are still actively mothering.” Now, does that sound like gratitude?) Although I knew many attractive ways to serve it, their palates were still in the “Just plain, please” mode, and I was still a working mom with more to do than figure out fancy presentations of a vegetable.

By the time they left the nest, I’d grown tired of broccoli, so it was a while before I’d even bother to look at it in the produce aisles. Then I discovered grilled broccoli – specifically this grilled broccoli with chipotle-lime butter and queso fresco – and became so crazed with the taste that I made my husband grill it twice in the first week.

The grilling process brings out the slight sweetness – yes, sweetness – of the broccoli; the little bit of char adds a flavor note that’s almost caramel. Those tastes are perfectly balanced by the salty tang of the lime and queso fresco, with a hint of smokiness from the Chipotle Tabasco. And the butter just pulls it all together.

Please don’t be put off by the Tabasco. Chipotles are jalapeños that have been aged and smoked. Farmers allow some percentage of the green jalapeño crop to remain on the vine until the end of the season, when they turn bright red and lose much of their moisture. The growers then pick these peppers and smoke them for several days until they resemble dried fruit. According to Wikipedia, it takes 10 pounds of jalapeños to make one pound of chipotles. They’re then sold as pods, powders, or preserved in seasoned adobo sauce (a paprika-based marinade). This recipe uses a variety of Tabasco sauce that delivers – in addition to a bit of heat – a nice, smoky flavor. The Tabasco is only half as hot as a green jalapeño, and if you’re nervous, you can reduce the amount.

Kitchen Goddess note: (1) The chipotle-lime butter can be made well ahead – I’ve kept it for a couple of weeks. (2) And the queso fresco is a crumbly, unaged white cheese that, according Wikipedia, is traditionally made from cow’s milk or a combination of cow’s and goat’s milk. It’s a pressed cheese with a salty-sour flavor, lighter but not too unlike either feta or farmer cheese. I get it at most grocery stores in Texas, and with the enlightened nature of major grocers these days, you probably can, too. I had a few brands to choose from, so I lingered at the dairy case until a Latina woman showed up and I asked her which brand. She said she preferred  La Vaquita. It’s also very nice crumbled on a salad or in scrambled eggs.

Grilled Broccoli with Chipotle-Lime Butter and Queso Fresco

Adapted from Food & Wine Magazine, June 2012

Serves 6-8.

6 tablespoons unsalted butter, softened
Zest of 1 lime, finely grated
Juice of 1 lime
1 tablespoon Tabasco Chipotle Sauce
1 teaspoon honey
1 garlic clove, finely grated
Salt
4 heads of broccoli, stems peeled, florets cut into large segments
Olive oil
1 cup crumbled queso fresco

Whisk together the first six ingredients. Season lightly to taste with salt. Allow the mixture to sit for at least half an hour, to let the flavors meld. (If you make it ahead, take it out of the refrigerator for at least half an hour, to bring it to room temperature.)

Drizzle the broccoli – florets and stems – with olive oil and season with salt. Toss lightly to get coverage with the oil.

Grill the broccoli over high heat, turning occasionally, for 10 minutes or until lightly charred and crisp-tender.

Transfer the broccoli to a large bowl or platter, and toss with the chipotle-lime butter. Scatter the queso fresco over the broccoli and serve.

Saturday, September 21, 2013

Foodie at the Farmers’ Market
What’s cooking? Ground Cherry Shazam


Every once in a while, a new fruit or vegetable shows up at my farmers’ market, issuing a siren call of sorts to people like me who are intrigued with the unusual taste or texture, to see what can be made of these foods. The latest to appear in our New Jersey market was ground cherries. Not ground-up cherries, mind you, but ground cherries, which are closely related to tomatillos. In fact, in their paper-lantern shells, ground cherries look like miniature versions of tomatillos.


The taste, however, is nothing like tomatillos. They’re sweet-tart, with a flavor many think reminds them of pineapple. Not me. To me, it’s a more mysterious flavor – think tomato crossed with melon. The berries, known also as Cape gooseberries, reach about a half-inch in diameter, and are yellow to bright orange, with numerous seeds like tomatoes.

They’re wonderful in fruit salads, pies, tarts, and jam. I first had them in Portugal, where they were served as a garnish with dessert, husks pulled back like leaves and berries dipped in a micro-thin candy coating. They’re also delicious pulled straight from their husks.

I was aiming for jam when I started this project, but it never set (gelled). I asked a friend who’s a pro at jams and jellies if she thought I should re-boil it. “No,” she said. “I’d just call it syrup.” But it’s thicker than syrup, yet thinner than jam. I call it Shazam. When you taste it, you’ll know it’s the perfect name.

Ground Cherry Shazam on yogurt.

What can you do with Shazam?

■ Spoon it over fresh goat cheese as an appetizer with crackers;
■ Stir it into Greek yogurt for breakfast or dessert;
■ Spread it on toast; or
■ Drizzle it as a glaze over chicken or pork before baking.

Use your imagination. I’m saving some jars of it to give as Christmas gifts if I don’t eat it all first. And if you don’t want to make so much – or shell so many ground cherries – this recipe is easily halved.

Ground Cherry Shazam on crostini with hummus.

Ground Cherry Shazam


Makes 5 half-pint jars.

36 ounces husked ground cherries (from 6 pint baskets)
4½ tablespoons lemon juice (about 2 lemons), plus 2 long, inch-wide strips of lemon zest
3 cups sugar
2 large sprigs thyme
2 tablespoons Domaine De Canton French Ginger Liqueur (optional)

In a large, heavy-bottomed stainless steel pan or an enameled cast iron pot (I use a 5.5-quart Le Creuset French oven), combine the ground cherries, the lemon juice, and the sugar. Heat, stirring frequently, until the sugar has completely dissolved. Place a round of parchment paper on top of the mixture to keep a skin from forming, cover the pot, and refrigerate 8 hours or overnight.

The next day, remove the parchment paper, place the pan over medium high heat, and bring the mixture to a rapid boil. Continue to boil the mixture for 15-20 minutes.

In the meantime, place a small plate in the freezer. After 10 minutes, test for the preserves to set by dribbling a spoonful onto the frozen plate and let it sit back in the freezer 2 minutes. If it turns into a soft get that moves only slightly when you tip the plate, the jam is set. Remove the mixture from the heat. If after 20 minutes, the jam still doesn’t appear to be setting, remove it from the heat anyhow. (Now you, too, have shazam!)

Stir the thyme and lemon rind into the mix and cover the pot. Let the preserves steep for 5-10 minutes, then remove the thyme and the lemon zest and stir in the liqueur if using. I take a potato masher at this point and smash about half the fruit – I like the look of the tiny seeds and the variations in texture.

Ladle the shazam (or jam) into clean Ball jars. Store in the fridge or process as for preserves.

Tuesday, September 17, 2013

Celebrating the Goldilocks Season
What’s cooking? Sunny Plumcot Sorbet and Lemon-Basil Butter Cookies

The Kitchen Goddess has been in Texas for a week, grappling with AT&T for a new modem because the house is too far away from the signal source to get U-verse. No internet, no blog. Grrr... I’m making up for that absence with TWO fine recipes that go together like, well,... cookies and fruit.


Now is the sweet spot of summer, when it’s not too hot and not too cold. So before we begin the great kitchen migration to soups and stews, lentils and lasagna, let us pause a moment for a final summer sorbet. And perhaps some cookies.

Not long ago, one of the stalls at my farmers’ market showed up with the loveliest little plums. Shiro plums, they said. Small, pale yellow orbs that turned out to be as juicy and delicious as they were beautiful. I bought a couple of boxes and made sorbet. It was so good, I wouldn’t let anyone else have it. Well, almost anyone else.


The next week, I went back to the same stall to get more so I could tell you all about them.

“They’re gone?!!” I said. “How can they be all gone? They just appeared last week!”

“I know,” said my friend manning the cash register. (I’ve become very chummy with many of these folks.) “But the crop this year was small. That’s the way it is with these trees – big crop one year, small crop the next. We’ll have lots next year.”

So now I’m waiting already for next year’s crop. Late July, early August – watch out for them.

Then by a stroke of luck, just this past week, I happened upon some greenish-gold plumcots at the grocery store. Larger and more heart-shaped than the Shiro plums, plumcots are a 50-50 cross between plums and apricots. (Okay, so it’s obvious.) But I’ll bet you didn’t know they were originally developed – and named – by Luther Burbank in the late 19th century. With the current fascination surrounding all things oddball from the food world, hybrids like plumcots are finally gaining some traction. Luther would be so pleased. Also apriplums, which are similarly 50-50 but developed through a different process. And pluots, which are a cross between a plumcot and an apricot and come closer to a 75-25 ratio of plum to apricot. Confusing? You bet. They all have a higher sugar content than plums, which means they’re slightly less tart. But I digress.


My research reveals an astonishing number of varieties of plumcots, with names like Harvest Gold, Emerald Beaut, Tropical Sunrise, Flavor Grenade, and Flavor Queen. The yellow, yellow-green, and green varieties appear to be the mildest and sweetest, so whatever you find at your grocery will likely do. And the really good news is that the flavor of my plumcot sorbet was almost identical to the Shiro plum sorbet.

Sorbet is soooo easy. I probably could have peeled the plumcots and just pureed the flesh, but I wanted the tiny extra tartness that comes from the skin, so I stewed them for 15-20 minutes. And instead of simple syrup, I added a mild version of minted simple syrup – the mint isn’t really noticeable, but it brings out the flavor of the plumcots in a way that is just magical. Sun on the tongue.

Sunny Plumcot Sorbet


Makes 1 quart.

1-1¼ pounds yellow or yellow-green or green plumcots
juice of 1 lemon (about 2 tablespoons)**
1 cup sugar
1 cup mint, chopped

Seed the plumcots and cut them into eighths. Put them into a large saucepan with the lemon juice and bring to a low boil. Cook 15-20 minutes on low boil, stirring occasionally to keep the fruit from sticking to the bottom of the pan. When all the fruit is soft, remove from heat and allow to cool to room temperature.

While the fruit is stewing, make the minted simple syrup. In a small saucepan, combine the sugar with 1 cup water and bring to a boil, stirring only until the sugar is dissolved. Stir in the chopped mint and let the syrup simmer undisturbed for 2 minutes. Remove the mint by pouring the syrup through a strainer into a heat-proof container, and allow it to cool to room temperature.

Put the stewed plumcots into a blender with 6 tablespoons of the minted simple syrup. (Save the rest for tea or your next batch of plumcot sorbet.) Purée 1 minute or until smooth. Process in your ice cream machine according to manufacturer’s directions.


**Serendipity is aimlessly wandering the produce aisle and finding these completely adorable pink variegated lemons. The equivalent taste in the wine world is that of a really good rosé – not actually sweet, but without the tang of a regular lemon. How can I say this? It tastes a little pink.

* * *

Don’t forget the cookies...


Having no garden in New Jersey, I was easily seduced by a giant bunch of basil at the market. I could make pesto, but desperately wanted some new idea. Basil sugar? I found a recipe for minted sugar, which is wonderful in iced tea or on fruit, then decided to try the technique with basil. Whoo-ee – a treat for the tongue and the nose. But what to do with a jar full of basil sugar? How about basil sugar cookies? Yes, sirree, they are mighty fine, if I do say so myself. Save some of the basil sugar for dusting on top of the little darlings, and serve them with ice cream, sorbet, pudding, or fruit. If you’re serving fruit, sprinkle a bit of basil sugar on it, too.

Lemon-Basil Butter Cookies


Makes 3 dozen.

1 cup + ¼ cup sugar
½ cup basil leaves, packed
6 tablespoons unsalted butter
2 tablespoons Crisco
zest of one lemon
1½ teaspoons fresh lemon juice
1 teaspoon vanilla
1 large egg
1¼ cup flour
1 teaspoon baking powder
½ teaspoon salt


Make the basil sugar by combining 1 cup sugar with the basil in the bowl of a food processor and pulse until well combined and no large pieces of basil remain. Store in a jar in a cool, dark place for 30 minutes to an hour, to allow the flavors to mix.

Cream the butter and Crisco together until well mixed, then add  ¾ cup basil sugar (packed) and the remaining ¼ cup plain sugar and beat until light and fluffy, 4-5 minutes. Add the lemon zest, the lemon juice, the vanilla, and the egg, beating well after each.

Sift together the flour, baking powder, and salt, and add to the wet ingredients at low speed until blended, scraping down the bowl once or twice with a spatula. Cover the dough with plastic wrap and refrigerate at least an hour.

Scoop dough to form balls 1½-2 inches in diameter, and place at least 2 inches apart on cookie sheets lined with baker’s parchment. Bake at 375º for 10-11 minutes, depending on how soft you like the insides. When cookies come out of the oven, dust with remaining basil sugar while they’re hot, and transfer to wire racks to cool completely. Store in airtight container.

Thursday, September 5, 2013

And the winner is...
What’s cooking? Italian Plum Ketchup


I couldn’t get any of the national accounting firms to come over for the drawing, so in the interest of ethical independence, my friend, Gusty Scattergood – who is also the author of the award-winning YA novel, Glory Be – came over yesterday to pull a name out of the bowl. The winner of the drawing for the Hamilton Beach Breakfast Sandwich Maker is... (drum roll, please):


I wish I had enough of those Breakfast Sandwich Makers to give one to each of you, but alas... You can, however, get one online or in many stores. For a start, I found them at Target, Bed Bath & Beyond, and amazon.com.

So for everyone else, today’s prize will have to be a different kind of treat – one that will also last quite a while, just not as long as an appliance.


One of the great late summer arrivals at the farmers’ market is a crop of Italian prune plums. Most of the plums you get at the grocery store are fat and round; these are more egg-shaped, and wear a beautiful powdery blue-purple skin – the color of royalty, which may explain why they’re also known as Empress plums. They have a wonderful sweet-tart taste, though the juice won’t dribble down your chin the way it does with the fat, round varieties.

Friday, August 30, 2013

A Drawing??!! With a Prize??!!! How Cool Is That!
What’s cooking? Breakfast sandwiches and more

Yes, it’s Spoon & Ink’s first ever drawing, with a really nifty prize. We – that would be me and my friends at Hamilton Beach – are giving away a Breakfast Sandwich Maker as part of their promotional efforts for the Back to School season. It’s not a contest – all you have to do is leave me a comment (be sure to sign it!) here or on my new Spoon & Ink Facebook page and you’ll be entered to win. I’ll be drawing the name of the winner on Wednesday, September 4.


The Kitchen Goddess has never been one of those cooks who feels the need for all the latest appliances to work her magic. I’ve never owned a crock pot or a toaster oven, and I long ago tossed out my electric skillet. Most recently, I traded in my coffee maker for a French press.

But I attended a food blogger conference this summer, and at one of the display booths, the Hamilton Beach folks were making breakfast sandwiches with this nifty little gizmo. I watched them make one after another for the conference attendees, adding ham or sausage or cheese or tomato slices, and I was hooked before I bit into mine. You don’t even have to include an egg – or you can use egg whites if you’re watching your cholesterol. Check this out...


The Hamilton Beach people developed the Breakfast Sandwich Maker as an aid to those school mornings when everyone is racing around like their hair is on fire, trying to get out the door in time for the bus or the carpool. I remember those days. Especially the ones when my older son was on the hockey team and practice ran 6-7 a.m. On my way to pick him up, I’d stop at the local diner for an egg sandwich that he would inhale on the way home so that he could shower and change in time for school. What I would have given for a Breakfast Sandwich Maker then.

I think he could use one even now, as his morning routine includes breakfast with his 20-month-old daughter. And my younger son – the med student – surely would be happy with one as he scrambles to get to the hospital for early rounds. So if you don’t want the prize for yourself, I’ll bet it would make a neat gift for someone you know.


They sent me one to play with, so I’ve been experimenting with various ingredients, from the traditional egg sandwich to my favorite breakfast sandwich: peanut butter and bacon. You have to cook the bacon before you assemble the sandwich, but a minute in the microwave will handle that, and the peanut butter comes out wonderfully gooey. What really amazes me is that the sandwiches remain hot for a long time. Wrap one of those suckers up in foil, and it’ll be good and warm until the last bite.

The chefs at Hamilton Beach have come up with a nice long list of ideas to use with the BSM, from a cheddar, apple, bacon and egg croissant to a pancake and sausage sandwich to a pepperoni and veggie mini-pizza. Use your imagination. In a bit of a wild moment last night, I made... (drum roll, please) S’mores. A little messy, and I’m still working on the technique, but with the non-stick surfaces on the machine, clean-up is easy – the ring assembly even lifts out and can go in the dishwasher.


So leave a comment here – and sign it! – or go to the Spoon & Ink Facebook page (which I must admit is still in the tweaking stage), and you’ll be included in the drawing on Wednesday.

And have a great Labor Day weekend!

Wednesday, August 21, 2013

Still Trying to Cool Off
What’s cooking? White Sangria


I’ve mentioned before the delightful group of food bloggers I’ve become acquainted with since moving to Austin. They’ve been open and generous with me in response to my questions about technology or social media or food photography, or just offering their friendship. So when one of them requested guest posts for her blog, I decided to give back. Her name is Lauren, and the blog is Gourmet Veggie Mama, which I think pretty completely describes her theme. I’m not vegetarian, but many of the recipes look very tasty, so I encourage you to check it out.

My guest post was back in June, but I figure summer is still upon us, and as pears are just starting to show up at the farmers’ market, this seemed like a good time to re-post what I gave her.


In the heat of the summer, nothing is quite so refreshing as sangria. But as much as I enjoy the traditional stuff, it can sometimes feel a little heavy for daytime drinking. (We all enjoy a little daytime drinking, don’t we?) So this recipe for white sangria is the perfect solution: cool, crisp, and light.

I love serving this to a brunch or a ladies’ lunch. It adds just the right touch of sophistication. And we recently served up gallons of it at a neighborhood cocktail party, where it was a huge hit. Kitchen Goddess note: If you’re serving a large crowd, it’s sometimes easier to make batches of the wine and fruit – which you can do a day ahead – then add ¼ cup (2 ounces) of sparkling water directly to each glass. That way, the carbonation doesn’t disappear before you serve it.

As for the wine to use, I prefer either a New Zealand Sauvignon Blanc or a Pinot Grigio, both of which have nice fruity notes that go well with the pears, kiwis, and grapes.

White Sangria

Adapted from The Silver Palate

INGREDIENTS
1 bottle dry white wine
2 tablespoons superfine sugar
2 tablespoons Calvados
3 tablespoons Cointreau or other orange-based liqueur (Triple Sec, Grand Marnier or my new favorite, Paula’s Texas Orange Liqueur)
2 kiwis, peeled and sliced thin
1 large pear, preferably green D’Anjou or Bartlett, sliced thin
1 cup seedless green grapes, halved

12 ounces sparkling water (not club soda)
sprigs of mint for garnish

DIRECTIONS
In a large glass pitcher, combine the wine, sugar, Calvados and Cointreau. Stir until the sugar is dissolved. Add the fruit, and allow to macerate in the refrigerator (covered) 4-5 hours or overnight.

To serve, stir well, then add the sparkling water and pour over ice in either a tall highball or Collins glass or a globe wine glass. Garnish with a sprig of mint.

Serves 6.

Friday, August 16, 2013

The Most Fun You Can Have with a Chicken
What’s cooking? Beer-Butt Chicken


The thing I miss most about spending the summer in New Jersey is outdoor cooking. Condo/apartment living means no grilling. And since I usually hand off that job to my husband, it also means I do all the cooking. Not so terrible, really, but I do miss that grilled flavor. So periodically, I persuade my son and daughter-in-law to let us come out and grill at their house.

The last time I did that, I’d had a hankering for beer-butt chicken. If you don’t already know about beer-butt chicken, LISTEN UP. Because it’s the best way I know of to get a moist, flavorful grilled chicken with almost no work. You hear that, folks? Almost no work. The vertical roasting position gives you an even covering of crispy skin, while the beer bastes the meat from the inside to infuse the entire bird with flavor. And the Kitchen Goddess has outdone herself on the spice rub.


Sunday, August 11, 2013

It’s a Cherry Jubilee
What’s cooking? Sour Cherry Frozen Yogurt and Cherry Sorbet


No, no, not Cherries Jubilee – that’s the hot dessert. This is about cold dessert – two of them – and both with cherries.

As you may have guessed based on recent posts, I’m pretty obsessed with frozen desserts this summer. First came the Minted Honeydew Sorbet in June, then the Peach Frozen Yogurt and the Apricot Sorbet in July. Now it’s August, and cherries are everywhere.

Frankly, there’s nothing more fun to do with fresh, juicy fruit before it disappears from the market. I know, you can preserve it – and I will – but sorbets and frozen yogurts and ice creams present the fruit with much less sugar and offer a taste that’s much closer to the fruit itself. Whether or not you are entertaining, these are great, light desserts. But if you are entertaining, they have a number of excellent points in their favor:

■ They can be made ahead of time.

■ They add great color to the table.

■ With the addition of nuts or chocolates or cookies or brownies to the plate, you have a dessert that appears complex – multiple textures and flavors – with little effort.

■ On a relative basis with other desserts, they’re low fat and low cal.

In addition to the frozen dessert thing, I’ve been struck this season with a mania for cherries. I’ve discovered sour cherries at the farmers’ market, and Bing cherries and Ranier cherries at most grocery stores right now. I had to make two batches of the Sour Cherry Frozen Yogurt, as my husband inhaled the first batch before I remembered to get a photo of it. And, by the way, you can make the frozen yogurt with Bing cherries if you can’t find the sour ones.

Kitchen Goddess note: For either of these recipes, you will want a cherry pitter. Even with this little instrument, pitting cherries is a bit tedious. But if you catch your husband (or a friend or son/daughter) in a weak moment, with the promise of a delicious frozen treat to come, you may be able to avoid the pitting yourself. It turns out that pitting cherries is an activity that can be done while watching golf on television.


Sour Cherry Frozen Yogurt

Makes about 3 cups.


1 pound fresh sour cherries, pitted (measured unpitted)
¾ cup sugar
1 piece fresh ginger, peeled, about 2 inches long
1 cup plain Greek yogurt (your choice: fat-free, 2%, or whole milk)

In a non-reactive saucepan, stir together the pitted cherries, the sugar, and the ginger. Cover and bring the mixture to a boil. Lower the heat and let the mixture simmer for 5 minutes, stirring occasionally to encourage the juices to flow. Remove from heat and let the cherries cool to room temperature.

Once the mixture has cooled, throw away the ginger. Purée the cherries and juices in a blender until smooth (2-3 minutes). Chill the purée well, then process according to your ice cream machine instructions.

Kitchen Goddess note: Sour cherries have a refreshingly tart taste that balances well with creamy yogurt. I’ve made it with 2% yogurt and with fat-free yogurt; the tastes and textures are the same, but the fat-free yogurt gets frozen a bit more solidly, and so can be difficult to scoop. However, if you simply leave it out for 10-12 minutes, it will soften enough to serve.

* * *

I’ve not tried this sorbet with Ranier cherries, which are slightly sweeter and have a more delicate flavor than the Bings. But the color is so luscious with the Bing cherries, I may not bother with trying.


Cherry Sorbet


Makes about 1 quart.

2 pounds Bing cherries
1 cup water
¾ cup sugar
1 teaspoon lemon juice (fresh!)
1 large strip lemon zest (½ inch by 2 inches)
1 tablespoon Domaine de Canton ginger liqueur (other options: 1 tablespoon kirsch or ⅛ teaspoon almond extract)

Place pitted cherries, water, sugar, lemon juice, and lemon zest into a non-reactive saucepan over medium heat and stir until the sugar is dissolved. Cook at low simmer 10-15 minutes, until the cherries are very soft. Remove from heat and let the cherries cool to room temperature.

Once the mixture has cooled, throw away the zest strip and add the ginger liqueur (or whatever other flavoring you want). Purée the cherries and juices in a blender until smooth (2-3 minutes). Chill the purée well, then process according to your ice cream machine instructions.

Tuesday, August 6, 2013

Stepping Out of My Comfort Zone
What’s cooking? Pizza!

Pizzaiolo Neil (center), with helpers Mike (L) and Max (R)

I once read that if you want to share a great experience with your child, you should make it be one in which neither of you is an expert. That way, you are on equal footing and can enjoy the learning process together. Which is the argument I used to convince my husband to take a pizza-making class with me.

I can’t remember how I found the class. Must have been some late-night web-wandering. And while I will confess to a tiny case of nerves, I figured I probably wouldn’t do worse than my hubby. Or would I?

We walked into Pizza a Casa at 11:45 on Saturday. It’s a tiny shop, holding sinks and shelves stacked with containers of olive oil and canned tomatoes and various spices on one wall, and photos of satisfied customers on the other. Definitely a New York pizza shop vibe. But instead of a walk-up counter and a handful of small formica-topped tables, down the center of the room sat a wide table with a raised shelf in the middle and six stations with stools along each side. Our classroom.

Ever the Teacher’s Pet personality, I gravitated to a station near the ovens, where the teacher would stand. “Always sit at the front of the room,” I used to tell my children. “It never hurts for the teacher to know you were in class.” Of course, we weren’t getting graded, but some habits die hard. And these days, my brain needs not to miss what’s said, or be distracted by the other students. It was also the best way to get good photos.

As I surveyed my station, I noticed with dismay the small packet of Fleishmann’s yeast. The dreaded yeast. Regular readers of this blog will already know of my yeast phobia, which has much to do with my training as a mathematician.

Math is precise. There’s always one right answer. The area of a triangle is always ½ bh (base times height). Parallel lines never intersect. But a blob of dough should rise “until it has doubled in size.” With no way to measure the blob, that instruction has always confounded me.

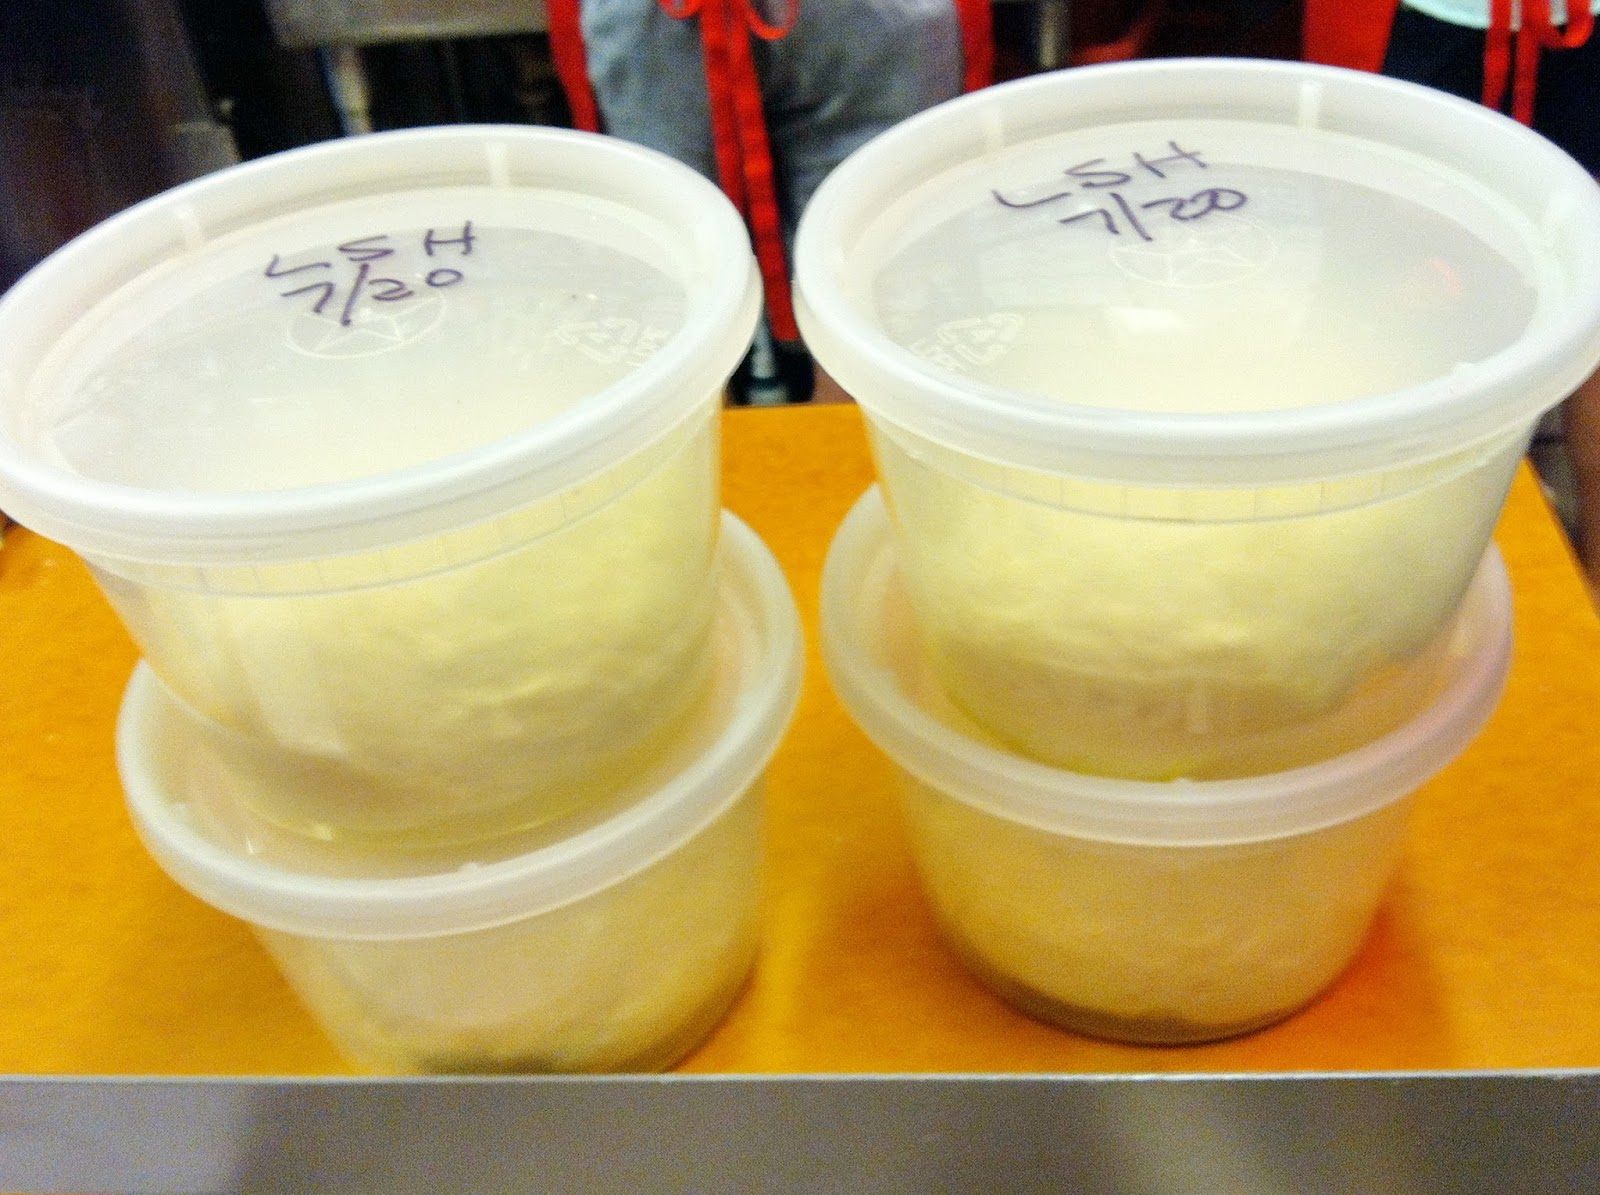
Pizza a Casa has now saved me. We started by mixing the yeast with warm water and sugar, both of which would speed the proofing process. At the same time, our teacher, Pizzaiolo Neil, explained that we’d be making a blob of dough that would weigh about 32 ounces (2 pounds). We’d cut the blob into quarters (8 ounces each), which, by chance, are about the size of an 8-ounce cup. In that case, if we put each quarter into a 16-ounce plastic covered container, the dough will have doubled in size once it fills the container. A miracle! How simple and precise is that? I could breathe deeply, relax my shoulders, and smile.

Step 1: Mix the dough into a large ball and knead it.
Mixing the dough was easy, especially when we used a metric scale to weigh the ingredients exactly. Oh, how I was loving this process. Then came the kneading part – not as exact, and not a skill I’ve ever worked on. I noticed that the love of my life was struggling a bit to get the dough off his fingers, so I reached over to help. He glared at me. I had to remind myself that I was not the Kitchen Goddess here, so back off. While we waited for our balls of dough to rise – about 45 minutes in the heat of the shop – Pizzaiolo Neil walked us through the rest of the process and fed us yummy samples of pizza possibilities.

Step 2: Cut the large ball into 4 small balls.

Step 3: Let the dough rise.
 It turns out that kneading is pretty simple compared to stretching the dough. (Once again, I thought it looked like my darling husband needed a bit more flour on his dough... oops! You know, for a moment there, I thought he was going to slap my hand.)

Step 4: Stretch the dough and add toppings. Here, pears and gorgonzola, to be followed with balsamic vinegar. Yum!

We learned several techniques helpful in turning the dough from a blob into a nice, flat 12-inch circle, starting with “soft bongo” pats to reach a 6-8-inch mound, then the “gravity drop” for stretching the dough, and finally the “DJ” stretch, to extend the shape to a circle or what passes for a circle in pizza class. (Neil was adamant that circle-ness is less important than not overhandling the dough.)

Swoon time: This one is thinly sliced potato (steeped in olive oil and herbs), pecorino, rosemary, and olive oil.
Bottom line? It was the most fun I’ve had in ages. Even my hubby said he enjoyed himself – in a masochistic sort of way. And it turns out that after you’ve made four of those pizzas, you really do feel like a bit of a pro.


The folks at Pizza a Casa were kind enough to allow me to include their recipe for dough here. But if you’re ever in Manhattan on a Saturday or Sunday with time on your hands – it’s a 4-hour class – get thee to the lower East Side and learn to make pizza. (You’ll actually need to reserve a spot, which is easy at their website, www.pizzaschool.com.) Or you can get their iPad app, DIYPizzaPie, which apparently covers most of what goes on in the class – except, of course, for the tastings. But for all these techniques – the mixing, the kneading, the stretching, and that ever-important move where you slip it into the oven – there’s really nothing like watching it happen to help you make a great pizza. Mangia!

Salad pizza: mozzarella, ricotta (with added butter), pignoli nuts, and arugula (added after baking).
Pizza a Casa’s Best Pizza Dough

Makes enough for four 12-inch pies.

20 ounces (3½ cups) unbleached all-purpose flour (plus more for dusting/stretching)
12 ounces water, warm (110º) – not hot
1 packet active dry yeast (or 2¼ teaspoons, if from a jar)
⅛ teaspoon sugar
1 tablespoon salt (fine grind, as in finishing salt)
1 tablespoon extra virgin olive oil (cooking oil quality – not the expensive stuff)
semolina flour (not corn meal)

Preheat oven to its maximum setting (usually 500-550º). Preheat for 1 hour if you’ll be using a baking stone, 30 minutes if you’re using a pizza screen, pizza pan, or baking sheet.

Stir the yeast into the warm water along with the sugar. Set aside. (Yeast should “proof” for 10-15 minutes.)

In the meantime, in a large mixing bowl, stir together the flour, salt and oil. Add the proofed yeast and stir until the dough is “shaggy,” which means well mixed and not overly sticky.

Turn the dough out onto a lightly floured surface, sprinkle a bit of flour on top, and knead 4-5 minutes, until the dough is smooth and elastic. Kitchen Goddess note: Kneading, pizza-style, means lean into the dough with your palm, press it down, press it forward, fold it over, and repeat. Or you can use a mixer with a dough hook, also for 4-5 minutes. When you’re done, the dough should be just slightly tacky – if its still sticky, dust it with flour and knead that in.

Divide your dough into four smooth balls, pinching together and smoothing any gaps in the surface. Set the dough aside in your 16-ounce containers and let it rest at least 45 minutes in an area whose temperature is 75-80º. (Or you can do a “cold rise” in the fridge for 1-2 days.)

To stretch the dough, lay it out on a surface dusted with flour, and begin by patting the dough – like playing bongos, moving from the center out – until it’s at least 8 inches wide. At that point,
you can pick it up by the edge (about the last two inches) and rotate the disk while letting the weight of the dough help to stretch itself. Don’t panic if your dough develops a hole – just pinch it together and flatten the spot.

Before adding toppings, move your crust to a pizza peel (that thin paddle used by pizzaiolos everywhere to slip the pie onto the stone) that’s been dusted with semolina. Add toppings and cook 6-10 minutes (depending on your oven), but you should begin checking after 5 minutes. We were cautioned not to overload our pizzas, as having too many ingredients – wet ones, especially – will change the way the crust bakes.

Amazing dessert pizza:  sliced banana, chopped peanuts, and Nutella (applied after the baking).
Kitchen Goddess note: It will not surprise you to learn that, in your quest to make perfect pizza, you can buy any of the equipment you might need at either the Pizza a Casa store or online.

Wednesday, July 31, 2013

Keeping My Cool
What’s cooking? Apricot Sorbet and Peach Frozen Yogurt

Normally, the idea that a giant hotel will, in 6 months time, be blocking part of the view from our condo would be enough to send a person into a deep funk.


The news was worrisome, mostly because it threatened our view of the Statue of Liberty. But in life, I try not to worry about events over which I have no control. I’m not sure it’s saved me any gray hairs, but it certainly reduces the number of things I worry about. So I’ve determined to make whatever lemonade I can out of this little lemon.


Mostly, it’s been really fun this summer watching the crews of construction workers pouring and smoothing foundations, installing windows, framing out rooms, and so on. Last week, when the weather was ghastly and I didn’t want to go out, the ever-changing panorama of workmen and cranes and those elevators that go on the outside of the building was a lot more fun than daytime TV.

The heat outside also encouraged me to generate more cool inside – with sorbets and frozen yogurts. With any fruit I can get my mitts on. OMG. Each flavor seems better than the last. So if you don’t have an ice cream maker, I heartily recommend one. Try one of these, all adapted from David Lebovitz’s The Perfect Scoop.

But first, a couple of the Kitchen Goddess’s notes about sorbets/frozen yogurts:

1. These recipes call for cooking the fruit in a non-reactive saucepan. Generally, that means anodized aluminum, glass (e.g., Pyrex), enamel-coated cast iron (e.g., Le Creuset), or stainless steel. Highly acidic foods – most fruits (including tomatoes), wine, and vinegars – react badly with aluminum and untreated cast iron, causing a metallic taste to leach into the food, changes in the color of the food, and pits/discoloration in the pan itself. Aren’t you glad you asked? You can use a copper pan, but only if you’re cooking fruit WITH sugar. Me, I just go with the stainless steel pans.

2. My friends at America’s Test Kitchen recommend “super-chilling” your dessert base by freezing a small amount (~½ cup) of it, then remixing it into the larger part  before transferring it to your ice cream machine. That seems to be effective in producing a less granular dessert.


Apricot Sorbet


Makes about 1 quart.

2 pounds really ripe apricots, pits removed
1 cup water
1 cup sugar
1 tablespoon Domaine de Canton ginger liqueur

Kitchen Goddess note: The ginger liqueur was my own idea. Or you can just add a piece of fresh ginger to the stovetop mixture. But if you get the ginger liqueur, your life will never be the same. Lebovitz added almond extract instead, which doesn’t sound nearly as exciting.

Chop the pitted apricots into eighths. (Don’t obsess on precise eighths – it’s all just going into a stew.) Bring the apricots and water over medium heat in a non-reactive pan, covered, until cooked through (about 10 minutes). Stir occasionally. When the fruit is completely softened, remove it from the heat and stir in the sugar. Let cool to room temperature.

Purée the mixture in a blender until smooth, about 3 minutes. Add the ginger liqueur. Chill thoroughly, then process in your ice cream maker according to the manufacturer’s instructions.

* * *


Peach Frozen Yogurt


Makes about 1 quart.

1½ pounds ripe peaches (about 5 large peaches)
½ cup water
¾ cup sugar
1 cup Greek yogurt (whole-milk, 2%, or fat-free – I used fat-free which makes the sorbet a bit harder to scoop straight out of the fridge, so I let it thaw 12-15 minutes first)
1 teaspoon fresh lemon juice

Peel and pit the peaches, then cut them into chunks. Put them with the water into a non-reactive saucepan and cook over medium heat – low simmer – until soft (they’ll start to look like canned peaches), about 12 minutes. Turn off the heat and stir in the sugar. Refrigerate until well chilled.

Purée the chilled fruit in a blender with the lemon juice and the yogurt. Depending on your preference, you may want to leave the purée slightly chunky; smooth or slightly chunky won’t matter to the flavor.

Process in your ice cream machine according to manufacturer’s directions.

Kitchen Goddess note: In a moment of what can only be described as inspiration, the Kitchen Goddess spooned on some of that fabulous Blueberry Syrup from an earlier post. OMG.


P.S. It turns out we’ll still have the best parts of our view, including Lady Liberty.